The 1899 Locomobile Steam Car Replica, known as the Lykamobile is a full scale live steam automobile manufactured in 24 kits. This kit is available from a company called "Steam Traction World" located in Daventry, United Kingdom. Each kit is to be manufactured and sent once a month for 24 months. However for cost considerations I have chosen to have my kits batched and dispatched in larger crates to the United States (Topsail Beach, NC).

Specifications:
• Length 7ft 2.6in • Height 5ft 3in • Width 4ft 7.1in • Weight 904 lbs.• Water Tank Capacity 12 Gallons • Fuel Tank Capacity 7.3 Gallons

Construction:

CHASSIS Tubular steel fabrication, combination weld, bolted and silver solder.
STEERING “Ackerman” design tiller steering.
DIFFERENTIAL & DRIVE Spur gear differential similar to the original Locomobile, drive shaft and bearings.
WHEELS & TYRES Single tube pneumatic, treaded.
BREAKING SYSTEM Disc brake system.
ENGINE 21/4" diameter, 3" stroke modified “Hackworth” valve gear.
WATER FEED Twin mechanical pump.
BURNER Fuelled by diesel.
BOILER Multi Fire Tube, fully constructed and complete with necessary paperwork and inspected by notified body.
BODYWORK & SEATS Wooden with steel frame, seating capacity of 2 persons, with turned decorative spindles with leather style upholstery.
Gears: forward and reverse.
Assemble with hand-tools only
Step-by-step instructions
Technical service and help-line backup
Designed on ‘Solidworks’ CAD
Manufactured on modern CNC machines for build accuracy and high quality


Sunday, November 26, 2023

Water Water Everywhere Water !

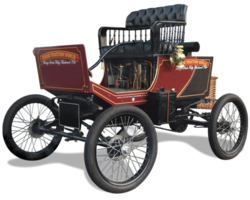
I have had two issues over the past year with the Lyka. One day I discovered a puddle under my Lyka that shouldn't have been there. Now this replica of the 1899-1903 Locomobile is prone to dripping water, oil and even some diesel fuel if everything isn't tight, but this puddle was different. Upon further investigation I could see that my tanks were dripping from a few weldments. After discussing with Steam Traction World, they were as perplexed and me. I use well water and my only thoughts are that these tanks do not like my water. I also discovered that the pipe threads had deteriorated too. My only solution was to clean the tanks as best as I could and seal the tanks with POR 15 fuel tank sealer. I also had to use thread inserts to fix the pipe threads. Below are a few pictures showing the issue. Everything is all back together with no leaking. 


My Second issue just happened this week. I was preparing the Lyka for our annual Town's Christmas Parade. Steamed her up, drove her around a bit, then loaded her onto my trailer to transport to the parade a couple of days earlier for the parade. I have a place to store the Lyka close to the parade. The Lyka ran just fine going up on the trailer, however when I arrived where I was going to store the Lyka, she began to buck just a bit and run rough. I had a feeling that the timing somehow was a little off. I loaded the Lyka back up and took her back to my shop. Did a re-timing and still she was bucking a bit. I jacked up one wheel and ran the engine trying to listen and see if anything to explain the rough running. Then all of a sudden, the engine smoothed out - that was odd I thought, until I realized the Lyka was spilling water out the back. I burst the copper tubing that goes from the hand pump to the feed pump.


Now what caused that! I decided to disassemble the feed pump to see if I could find a blockage. What I discovered is that the two ball check valve stops had become loose and were not in their proper 1.5mm distant from the ball.


You can see the jam nut has loosen and the other M6 hex head screw has loosened away too. This is not good. Below is a diagram I drew up of how the feed pump should be. When the pump piston goes up the left ball will close and the right ball will rise, opening up for water to be drawn in from the tanks. Once the pump piston starts to transverse down the right ball will seat itself closing off the tanks and the left ball will rise allowing the water to go to the boiler or bypass circuit. The hand pump prevents water from escaping in that direction too - basically a dead end.
In the next diagram you see the left ball has been jammed shut by the M6 screw loosening up and resting on top of the ball. This prevents the water from exiting out the feed pump to the boiler or bypass circuit. Water is not very compressible so when the pump piston goes down it is pressuring the hand pipe tubing and causing the engine to buck like hitting a brick wall. The copper tubing actually expanded over much of its length going from about 3/8 inch diameter to close to 1/2 inch diameter (about 0.45 in places). Finally, the copper tube burst open.

I have put in a request to STW to purchase a new LK1556 copper pipe. Hopefully they can make one up for me soon.

So for any other Lyka builder reading this....Use Loctite or some type of thread lock to fix the adjustable M6 screws in place. The instructions don't say anything in this regard, but knowing now what has happened, thread locker is required.

Wednesday, May 18, 2022

Basket (to hide the burner)

Finally received the very last item from Steam Traction World to finish my Lykamobile Series 2. Not that the red burner was an eyesore, and actually it did kind of fit in with my paint scheme, I'm glad to finally get it installed.

Well, the instructions from STW say to screw the wooden wedges from the inside surface of the rear panel, this would necessitate me taking apart my rear brake light and license plate bracket. I didn't think it matters much which way you screw the wooden wedges onto the surface of the rear panel, so I opted to use some small pan head screws. Now mind you the rear panel is thin, and this may pose a problem if there isn't enough "bite" to keep the wedges secure by the wood screws. But I really believe it will be just fine. If it does become I problem, I can always screw them onto the rear panel per STW's instructions.
The first task is to mount the right wooden wedge along the edge of the right side of the cut-out for the burner. I temporarily used some C-Clamps for positioning.

Before securing this piece to the rear panel, I went ahead and temporarily mounted all of the wooden wedges to see how these pieces fit up.
All the pieces are now screwed into the rear panel which allows me the ability to see how well the basket align with the wooden wedges. What I discovered is that the basket (being handmade) is not exactly square and actually is about 1 inch narrower at the bottom. Therefor I realigned the pieces to better match up to the basket.


The right-side piece I moved over to better align with the basket.
I also sanded down the edge some to better fit the angle.
All repositioned.
I loosely placed the basket in its final position before drilling the mounting holes for the metal bracket.


All mounted up, the next step will be to take it all apart and paint the wooden wedges and metal bracket black and do a final assembly.

Monday, May 16, 2022

Jim's (Poppapope) New Build

Glad to welcome a new Lykamobile enthusiast to our club. Jim has just received notice that his first 13 kits will ship out this week sometime. I look forward to following Jim's build on his new Blog which you can check out by clicking the following link: Poppapope's Steam Car. I have also added this link to my sidebar too.

Thursday, December 9, 2021

Christmas Parade 2021

I have a short video of our small town's Christmas Parade with my Lykamobile, 1929 Model A Ford Phaeton and my father's 1966 Mustang Convertible 289 4V that he purchased new.  

Also today I mounted a Locomobile insignia on the back of the seat rest. This was a nicely finished piece that I found at the October 2021 Hershey, Pennsylvania AACA Car Meet.

Now if we could just get that wicker basket to cover the red burner would be great!

Thursday, October 21, 2021

Start-up Procedure

I thought I would go over the start-up procedure that I use. One of the issues that causes a lot of time to start up the Lykamobile from a cold start is that the boiler becomes completely filled with water from the previous cool down operation. Because the system is not vented, a vacuum is created in the boiler as everything cools down, contracts and water is drawn from the supply tanks into the boiler. This means there is no head space in the boiler the next time you want to fire up the Lykamobile to create steam.

Previously I would open up the two valves on the boiler and wait and wait and wait for the water to slowly drain out of the boiler. This works, but what a pain.

So the following procedure is what I have "boiled" everything down to. (sorry for the pun). I decided to utilize the expansion of the water during the boiler heat-up by opening the valves and allowing the expansion of the water to push the excess water out of the boiler. But first the following is done:

1. Check the steam oil reservoirs. Fill if needed. Top off the water tanks.

2. Oil everything, water pumps, valve rods, piston guide blocks etc. In my case I open up my drip oiler to give everything a dose of oil.
3. Open up one of the blow down valves (right side) and also the piston/ valve box valve.

4. I place the drive in the neutral position.
5. Then I turn on the burner to heat up the boiler, after a few minutes water begins to be pushed out of the boiler through both opened valves. I depress the throttle some too to facilitate the withdrawal of water from the boiler. As you can see the boiler pressure is low at this point given that there are two valves opened.


6. As the pressure begins to rise a bit more, you can tell there is more steam versus water coming out of the boiler, but still a lot of water.

7. Once I see mostly steam coming from both valves I close off the boiler valve and still purge water/steam through the piston/ valve chest until I see mostly steam. This also warms up the pistons and valves helping to prevent condensation etc. inside the engine. I should make a caution ! Don't drain too much, you just want to lower the amount of water in the boiler some to provide the head space for the steam. The piston/ valve box valve exhibiting steam is an indication that you now have some head space in the boiler for steam generation.
8. Now I close the piston/ valve box valve and the boiler rises to its final operating pressure.
Now you are ready to go steaming! This takes about 15 minutes for me.

Popular Posts